Pages

Saturday, 30 July 2016

Knitting and crochet for health: myth or reality?

Knitting and crochet as a tool for wellness doesn’t really come as a surprise to those of us who wield pointy sticks or a hook.  However, it’s easy to see why the non-knitters and crocheters are sceptical about it.  However Betsan Corkhill, formerly an occupational therapist and non-knitter, noticed how knitting in particularly helped her patients.  Fascinated by her own observations and anecdotal evidence she became inspired to find the science behind this phenomenon, believing the impact of knitting should not be taken lightly.
 
I first came across Betsan’s work through reading by Kathryn Vercillo’s book ‘Crochet Saved My Life’.  Personally I have my own battle with anxiety and depression, so it was through self interest I downloaded this interesting and deeply personal exploration of the relationship between needlecrafts and recovery from mental illness. 

Kathryn refers many times to Betsan’s research, particularly in relation to Betsan’s organisation Stitchlinks.  After a quick look through www.stitchlinks.org I became intrigued with the concept of crafting not just for specific health issues but for more general health and wellness.  When I found that Betsan was leading a ‘Theraputic Knitting’ course locally it made sense to sign up and find out more.
 
On the day of the course I was astonished by the science we were quickly presented with behind why knitting, or crochet, works as a tool for wellness.  My employment background is in education and I have some training in counselling so it really shouldn’t have come as such a surprise to me, perhaps especially with the current focus on mindfulness in mental health circles.  But it did.  Betsan presented satisfyingly detailed information about how our brains work, both biologically and chemically and how the chemistry of stress causes so much damage to our minds and bodies.  But here was the revelation to me: there are so very many aspects of knitting and crochet that complement our own inbuilt wellness systems.  And not just the physical process of knitting but also the accompanying processes of learning, being challenged and being part of a social group to name a few.  The revelation that people living with chronic illness and pain have successfully integrated knitting and crochet into the management of their conditions truly shocked me.  How could something as simple as stitching make such a massive impact to a person’s life?  We were introduced to research that agreed again and again it did.  The ‘Pitching for Stitching’ campaign by the Neuro Orthopaedic Institute, Australasia was particularly compelling.  I have observed, first-hand the benefits crochet has for my own mental health so this element wasn’t a surprise to me, but it was very interesting to find out how it works, why it helps me to cope.

I bought a copy of ‘Knit for Health & Wellness: How to knit a flexible mind and more...’ and Bethan kindly signed it for me.  It’s extremely useful for reminding me how much benefits I gain from knitting and crochet and provides practical advice on how to get the maximum benefits.  For example having a few different projects on the go is actually a good thing, it gives you a choice of activities for what you need most right at that moment, from a straightforward project requiring little focus on a pattern to allow more focus on the calming, rhythmic and meditative nature of the process, to a more challenging project which develops our skills, therefore building new neurological pathways in our brains, keeping us interested and involved in life.
 
If you already knit or crochet then Betsan’s work shows you how to get the best results for maintaining your own health and wellness.  For those who don’t then it’s an appealing argument for why you might want to take up the hobby.

Useful links:
www.crochetconcupiscence.com is Kathryn Vercillo's blog and an informative and fun place for all things to do with crochet and wellness.

www.stitchlinks.com is an ever evolving hub where newest research findings can be found, forums for support and encouragement and many other resources to both fuel your own wellness journey as well inspire other people’s.

Betsan’s personal blog: www.betsan.org/blog is another place to find encouragement and information.
 

Saturday, 18 June 2016

Fork Pom Poms

Yes.  Really.  Teeny tiny pom poms can be made by using a fork.  Any fork.  Go and grab one from the cutlery drawer!

You need these four things: fork, scissors, small amount of yarn and small piece of embroidery thread.  The embroidery thread, that green stuff right there in that photo, is the secret ingredient for perfect teeny pom poms.  I'll explain why later.
Start off by wrapping your yarn (I'm using dk here, my usual go to yarn of Stylecraft Special) around the fork, not too tightly, you'll need to slide it off easily later on. It's a bit of trial and error to work out how much yarn you are going to need for a nice chunky little pom pom.  I used all the yarn in the photo above for this one.
Next thread the embroidery thread through the centre slot of the fork, right between those middle prongs. 
Then slide the thread through the middle centre at the top of your fork and tie it around your yarn like a little belt.
Now here's the trick to perfect fork pom poms.  You need to tie this thread very, very tightly around the yarn.  You need skinny but very strong thread for this.  The tighter you pull that knot, then another knot right over it (double knotting the thread) the better your pom pom will be.  If you use the yarn to do this bit your pom pom will separate where you tied the yarn.  I know this from experience.  It's not a very happy looking pom pom.
Now the magic starts to happen!  Carefully slide the fork out of the yarn and you create a little yarn wheel!
Can you see it's pom pom potential now?  It's very nearly there!  Now start snipping those little loops of yarn with the scissors. 
Keep going, all the way around.  Then when you've snipped every loop, roll the pom pom around in your hands to give it a bit of shape.
Now, you've got yourself a pom pom, but it's a little bit scruffy...give it a quick trim...
That's better!  You now have a perfect little pom pom!  Adorable right?  You can either use it's little thread tail to attach it, or chop it off, it really won't matter that it's a different colour because it's hidden inside the pom pom's fluffy strands.  The more securely you tied the knot in the middle the more secure your pom pom will be, however if you want to be super certain that your pom pom will stay in one piece you could add a dab of glue at the centre. 
So there you have it.  A pom pom made with a fork.  Cute eh? Maybe you should make it a friend, or twenty...  Do be careful this pom pomming can be addictive...  Have fun!


Saturday, 4 June 2016

PDF pattern for Stripy Snood / Cowl / Neckwarmer now in the PlanetYarnUK etsy shop!


Finally listed my very first, proper pattern in the shop.  Hopefully now I can be a little braver and start writing up my other patterns too.  It's quite nerve wracking writing up a pattern, I'm so very conscious that it needs to make complete and perfect sense.  I want my patterns to be very straightforward and easy to follow.  My lovely pattern testers helped me out a lot, thank you ladies! 

The Stripy Snood / Cowl / Neckwarmer is going to be my first kit too...just got to get together all the different bits and pieces, take some pretty pics and upload it.  Sadly it's not that sunny today, but hopefully it'll be bright enough to take some good quality photos.

Have a splendid weekend!

Thursday, 2 June 2016

Come to the yarn side, we have pom poms.


We do, we do, we really do!  Just spent the afternoon happily taking photos in the sunshine of some fabulous new stock!  Here are the gorgeous Knitpro Waves crochet hooks with lovely ergonomic soft touch handles.  They are an absolute joy to work with and my favourite crochet hooks to use.

Also, new in are these beautiful Knitpro aluminium knitting needles, lovely to handle and they come in pretty colours too!

But what about the pom pom nonsense above?  Well...  I'm now the proud stockist of the very fabulous Clover pom pom makers, both the small and the large size.  The blue and green makers are from the Large Pom Pom Maker set and the pink and yellow makers are from the Small Pom Pom Maker set. 


As instant gratification goes these pom pom makers are tough to beat!  You may have guessed that I'm rather fond of pom poms and these clever little devices are my absolute favourite way to make them.  It's so simple and quick! 
First of all you open up one side of the maker's clips and start wrapping yarn around them (pic 1).  Straight from the ball of yarn!  No need to make teeny little balls to push through the middle because there is no middle!  Can you tell I'm impressed by these ingenious gadgets? Once the first side is filled close the clips and open the other side's clips.  Keep wrapping (you don't even need to break yarn) until your pom pom maker is full.  
pic 1, the pom pom begins...
Then, just like with the traditional rings of cardboard pom pom making, cut around the edges of your yarn disc and then tie a piece of yarn tightly in the centre of the clips.  However, unlike using pieces of cardboard, the clips very cleverly keep all those little strands of yarn tightly together so you've got no danger of pom pom disintegration before it's even begun it's fluffy little life.  Then you gently separate the two sides of the pom pom maker (pic 2) and there it is!  A perfect pom pom!  Ta dah!

 
pic 2, ta dah a pom pom is born!
I know, it's okay, you can say it...I clearly need to get out more right?  Heheh!  But seriously!  Pom poms!  Exciting right?  As you can see from Kira's face, as I was taking pom pom photos...not everyone shares my pom pom enthusiasm!

 
Right then, I'm off to do some crochet in the sun.  Got to make the most of this sunshine!


Thursday, 12 May 2016

O frabjous day! Callooh! Callay!

No, I've not slain a Jaberwock, well not today anyway...

The great excitement is because I've finally opened my very own little yarn shop today!

A discussion round the dinner table at work (yes we do have one in the staffroom and it's very lovely actually to chat and eat!) a few months ago spurred me into action.  We were discussing, like you do, what we would do with our lives if we won the lottery, or something that left us with so much cash we wouldn't need to do 'real' paid work anymore.  I waxed lyrical about my dream of a yarn store.  It was gently pointed out to me that I really didn't need to win the lottery to do that.  I had never really thought of it that way before. 

After calming me down and persuading me that re-mortgaging the house was a Very Bad Idea, my long suffering husband talked me down from buying a year's rent on a shop that I would never be able to afford.  He kindly, and with great patience, reminded me that t'internet is likely a Very Good Idea for a place to open my shop.

So, dreaming big, I would one day love to have a retail space for real life customers and have classes, and stitch and bitch groups, and fabulous window displays, and maybe a café, and... yeah all that...however, for now I am content to run a very modest indeed little shop in a teeny corner of the internet and enjoy myself and feed other people's yarny habits too.

...back to the point...I admit this post got away from me a little...the shop's opening and there's 10% off for this glorious opening weekend.  But you knew that from the graphic above anyway didn't you...heh!  If you fancy spoiling yourself with some very lovely Stylecraft yarn from Planet Yarn then put in the code OPENINGOFFER when you check out and you'll get a nice juicy ten percent off your total price. 

Have a fabulous weekend, whatever you get up to.

Debbie


Life is a Cabaret old chum!

So.  I've done my first shopping from my own shop.  Heh!  This gorgeously soft and vibrant yarn even has a strand of sparkle in it. It's called Cabaret. Quite fitting for something that's glorious and a little bit glam.  I think this ball wants to be a scarf/shawl thingy.  Actually, after just smooshing my face into it (only allowed after I've bought it and claimed it as my very own...promise! ) it totally has to be some draped scarf type thing I can snuggle into. 
Tomorrow is the grand opening of my brand new little online shop.  I'm very excited about opening this new chapter in my life.  I'll be updating the blog tomorrow with a special discount code to celebrate. 
Off to Google for a pattern now!  For my beautiful new yarn.  *squishes new ball of yarn happily* My precioussssssssss.

Sunday, 14 February 2016

Little Amigurumi Hearts

I'm very fond of hooking up these little hearts.  They look super cute and don't take too long to finish, not quite instant gratification but close! 

 
This isn't a beginner pattern I'm afraid, you'll need to know about magic loops, hooking in spirals rather than rows and there is a teeny bit of tricksy joining (but I've added some photos to help you out with that bit).  When you get the hang of these techniques they'll be flying off your hook!  
 
 
I use stylecraft special dk and a 3mm hook, but you can scale up the yarn and hook for bigger (or scale down for smaller) hearts.
 
 
I usually stuff the hearts, lightly - not to bursting!  It gives them a lovely 3D effect.  However if you don't stuff them, they do make a lovely flat heart that holds its shape well and makes a very cute brooch, if you sew a brooch back onto it.
 
 
So the pattern:
 
There is no need to slip stitch rows together because it's all done in a spiral, rather than rows.  I do find it helpful to use a stitch marker to show me when I've finished a round though.
 
 
I'm using American crochet terms (I know, really! Shocking!) because they make more sense to me...
 
 
Make two 'bowls':
sc 6 into magic circle then pull tight (6)
sc 2 into each sc (12)
sc around (12)
sc around (12)
break yarn
 
 
Now you you have two teeny little bowl shapes, they are going to make the top of your heart.  While they are still easy to get to, sew that magic circle tail into the middle firmly, you don't need to worry about trimming it...all the ends will get caught up in the middle of the heart - yay!  You need to secure your tails where you broke your yarn as well.  Again leave 'em as long as you want, just make sure they're firmly secured.
Join your bowl shapes together by either slip stitching or good old needle and thread stitching, it really doesn't matter! 

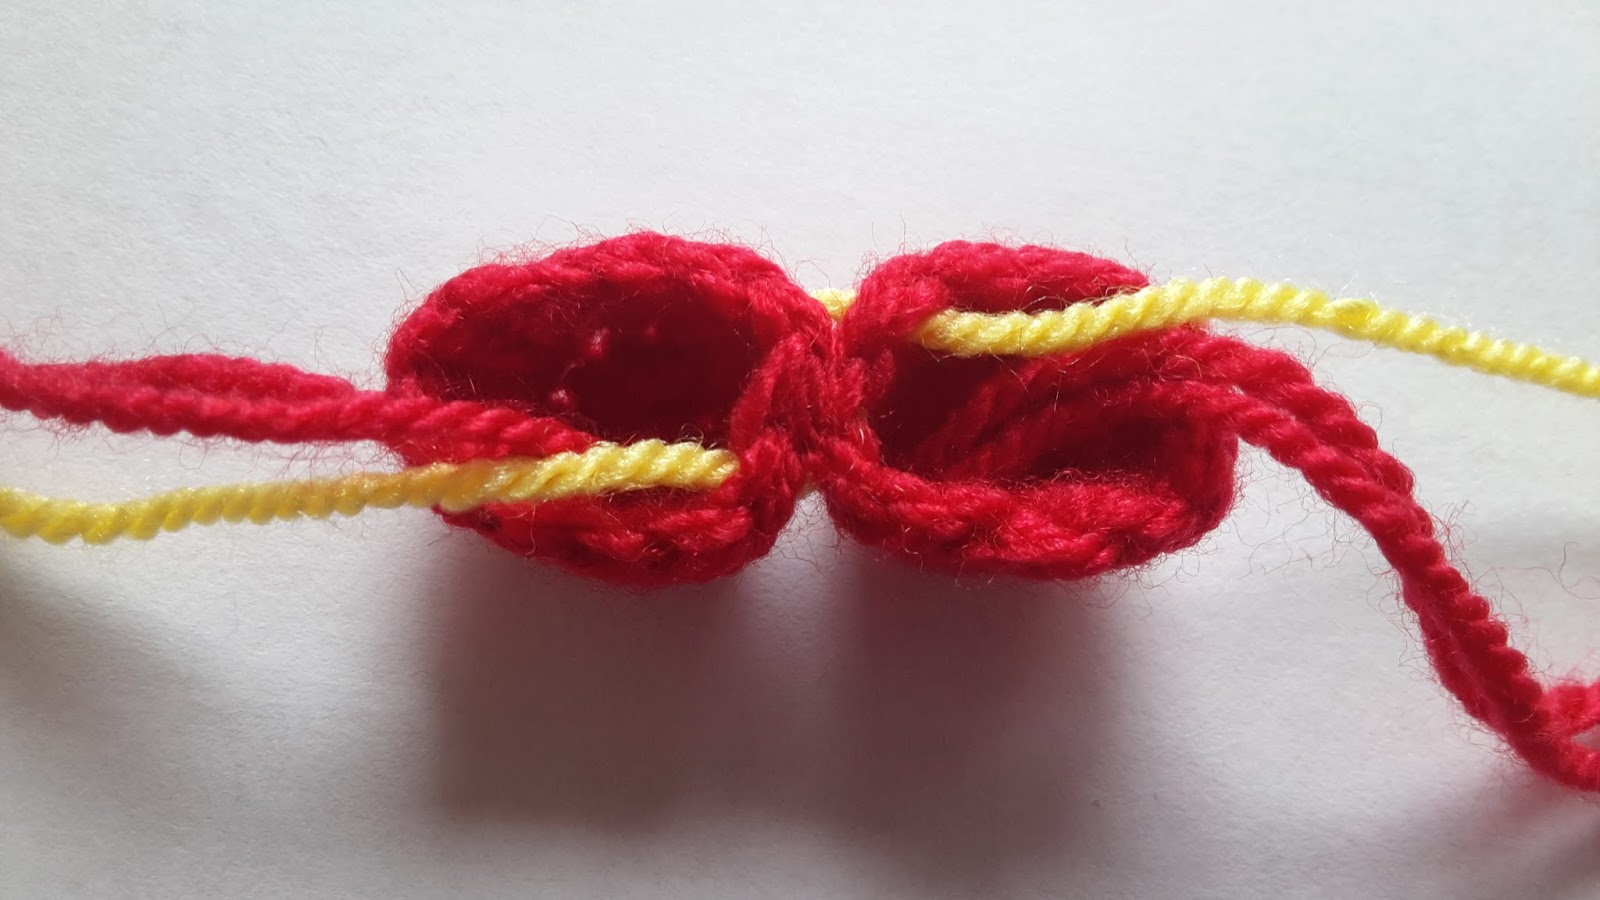
Here I've shown, in contrasting yellow, how to join the top two sections of the heart by stitching.


This photo shows them pulled tightly together ready to start stitching around the edge.  I'm only using yellow to highlight how to join, obviously you're going to need to use the same coloured yarn as you are making your heart with! Heh!

join bowls by sewing 3 stitches from each bowl together so your stitch count around the edge of your shape is now 18 sc.

 
Now sc around, completely missing out those stitches you've just sewed together (18)

Here's what it will look like after that first 18 stitch round, hopefully it's clear how I've missed those stitches I joined together with the yellow yarn above.


Here's what it should look like on the outside, you can see your little heart shape beginning to form!


sc around again (18)

now you are going to start reducing your stitches to make the bottom section of your heart, it's sort of cone shaped.
 
then *3sc and sc2tog* until you only have ten sc left, (10)
 
(if you're going to stuff your heart, now is the time to do it!)
 
now *sc2tog, 1sc* until you have closed the pointy bit at the bottom of your heart.
break yarn
secure your heart's little tail and you are done!
Or you can attach your heart to a bamboo skewer for a pretty balloon type effect:
I have a little garland of these and matching pom poms across my mantelpiece.  Very cute.
Have fun with your teeny hearts and let me know how you get on with the pattern.  I'm very much a novice at pattern writing and feedback would be appreciated!
Here's the pattern on it's own, minus my chuntering:
 
Make two 'bowls':
sc 6 into magic circle then pull tight (6)
sc 2 into each sc (12)
sc around (12)
sc around (12)
break yarn

join bowls by sewing 3 stitches from each bowl together so your stitch count around the edge of your shape is now 18 sc.
 
sc around, completely missing out those stitches you've just sewed together (18)
sc around again (18)
*3sc and sc2tog* until you only have ten sc left, (10)
 
(if you're going to stuff your heart, now is the time to do it!)
 
*sc2tog, 1sc* until you have closed the pointy bit at the bottom of your heart.
break yarn
secure your heart's little tail and you are done!